| Tool | Purpose | Example |
|---|---|---|
| Powerlevel 10k | Zsh theme for speed and flexibility | p10k configure |
| nvm | Node Version Manager | nvm install stable |
| node | JavaScript runtime | node --version |
| npm | Node package manager | npm install -g pnpm |
| pnpm | Disk space efficient package manager | pnpm --version |
| bun | Fast all-in-one JavaScript runtime | bun --version |
| rustup | Rust toolchain installer | rustup default stable && rustupupdate |
| cargo | Rust package manager | cargo install just |
| just | Command runner | just |
| eza | Modern replacement for ls | eza |
| fd | Simple, fast alternative to find | fd pattern |
| ripgrep | Fast alternative to grep | rg pattern |
| ast-grep | Structural search and replace | ast-grep |
| bat | cat clone with syntax highlighting | bat file.txt |
| zoxide | Smarter cd command | z directory |
| git-delta | Syntax-highlighting pager for git | delta |
| uv | Fast Python package manager | uv tool install httpie |
| pre-commit | Git hook management framework | pre-commit install |
| httpie | Modern command-line HTTP client | http GET example.com |
| yt-dlp | A feature-rich command-line audio/video downloader | yt-dlp "example.com" |
| lazygit | Terminal UI for git | lazygit |
| fzf | Command-line fuzzy finder | fzf |
| jq | Command-line JSON processor | jq . |
git clone --depth=1 https://github.com/romkatv/powerlevel10k.git ~/powerlevel10k
echo 'source ~/powerlevel10k/powerlevel10k.zsh-theme' >>~/.zshrc
MesloLGS NF font available to all
applications on your system.p10k configure and answer Yes when asked whether to install
Meslo Nerd Font. Alternatively, open iTerm2 → Preferences → Profiles → Text and set Font to
MesloLGS NF.MesloLGS NF family.fontFamily under
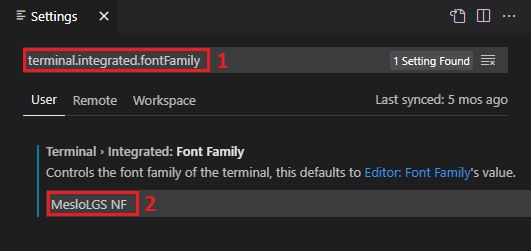
module.exports.config to MesloLGS NF.terminal.integrated.fontFamily in the search box at
the top of Settings tab and set the value below to MesloLGS NF.
Consult this screenshot
to see how it should look like or see this issue for extra information.font-family = "MesloLGS NF"
nvm on
nvm install stable
nvm use stable
node --version
npm --version
npm               # to see if there is a version to upgrade to
npm install -g bun
# npm install -g bun@1.2.4  # (to upgrade or use a specific version of `bun`)
npm install -g pnpm
# npm install -g pnpm@9.0.0  # (to upgrade or use a specific version of `npm`)
bun --version
pnpm --version
rustup default stable
rustup update
cargo install just --locked
cargo install eza --locked
cargo install fd-find --locked
cargo install ripgrep --locked
cargo install ast-grep --locked
cargo install bat --locked
cargo install zoxide --locked
cargo install git-delta --locked
cargo install typst-cli --locked
uv package manager, which is an extremely fast Python package and project manager, written in Rust..uv tool install --python 3.14 pre-commit --with pre-commit-uv
uv tool install --python 3.14 httpie
uv tool install --python 3.14 "yt-dlp[default]"
uv tool, which uses a python installation it manages, not the system python./Users/iancleary/.local/share/uv/tools/httpie/lib/python3.9/site-packages/urllib3/__init__.py:35: NotOpenSSLWarning: urllib3 v2 only supports OpenSSL 1.1.1+, currently the 'ssl' module is compiled with 'LibreSSL 2.8.3'. See: https://github.com/urllib3/urllib3/issues/3020
uv tool, this issue goes away, since we are not using the system python installation.go install github.com/jesseduffield/lazygit@latest
p to pull
Use Shift + P to push to the current branchsudo port install fzf
sudo port install jq
# Find files interactively
fzf

# Preview files with bat
fzf --preview 'bat --color=always {}'

# Use fd as the default source (respects .gitignore)
export FZF_DEFAULT_COMMAND='fd --type f --hidden --follow --exclude .git'
# Search file contents with ripgrep, then open in editor
rg --line-number . | fzf --delimiter ':' --preview 'bat --color=always --highlight-line {2} {1}'

# Find directories with fd
fd --type d | fzf
Add these to your ~/.zshrc:
# Fuzzy cd into a directory
fcd() {
  local dir
  dir=$(fd --type d | fzf --preview 'eza --tree --level=1 {}') && cd "$dir"
}

# Fuzzy search command history
fhist() {
  local cmd
  cmd=$(history -1 0 | fzf --tac | sed 's/^ *[0-9]* *//')
  print -z "$cmd"
}

# Fuzzy checkout git branch
fbr() {
  local branch
  branch=$(git branch --all | grep -v HEAD | fzf --preview 'git log --oneline --graph -10 {}' | sed 's/.* //' | sed 's|remotes/origin/||')
  git checkout "$branch"
}
npm i -g @openai/codex
curl -fsSL https://claude.ai/install.sh | bash
Claude Code can use a local browser for development preview, allowing it to visually verify changes and interact with your running application.
claude --browser
This launches Claude Code with browser capabilities, enabling it to open local dev servers, take screenshots, and verify UI changes as part of the development workflow.
Claude Skills let you teach Claude Code reusable capabilities. Create a .claude/skills/ directory in your project with SKILL.md files that describe how to perform specific tasks.
mkdir -p .claude/skills
touch .claude/skills/SKILL.md
Each SKILL.md file teaches Claude Code a specific capability — like how to deploy your app, run tests, or follow your coding conventions. Claude Code automatically reads these when working in your project.
I manage my shell configuration with a dotfiles repo that syncs across machines. On macOS, this covers zsh configs, Powerlevel10k, shared aliases, and AI agent configuration.
git clone git@github.com:iancleary/dotfiles.git ~/dotfiles
cd ~/dotfiles
./sync-dotfiles.sh push   # Install configs from repo
./sync-dotfiles.sh pull   # Backup current configs to repo
./sync-dotfiles.sh status # Check for differences
The sync utility detects the OS and installs the appropriate files — zsh configs on macOS/Linux, bash configs on Windows. Shared utilities are installed on all platforms.
.zshrc, .zshenv, .zprofile — Zsh configuration with Powerlevel10k.p10k.zsh — Powerlevel10k theme configuration.common/aliases.sh — Shell aliases (eza, git, docker, cargo, just).common/agents-git-trees.sh — Git worktree helpers (ga/gd).claude/ — Claude Code settings, skills, principles.codex/ — Codex CLI rules and MCP serversAdd window padding to your Ghostty config file (~/.config/ghostty/config):
window-padding-x = 8
window-padding-y = 0,4
The window-padding-y = 0,4 sets 0 padding on top and 4 on the bottom, giving a clean look with minimal wasted space.